
Table of Contents
This is an old revision of the document!
Foam Etching PCBs
WORK IN PROGRESS
Disclaimer
This instruction has been written for a supervised session performed in a chemical lab. Be careful when applying to a different environment.
Introduction
This instruction is about producing printed circuit boards (PCB) from prepared board schematics to component placement. The technique of PCB manufacturing employed in this lab is that of chemical etching. To put it simply it is a five step procedure:
- Create PCB mask for UV exposure.
- expose PCB to UV light while protecting certain areas with a mask
- develop PCB schematic using sodium hydroxide
- etch PCB schematic using iron chloride
- clean PCB of residue using alcohol wipes
Resources
Here is a list of supplies you probably need:
- cleaner (e.g. ethanol or aceton)
- purified water
- paper towels
Optimally this process is executed in a chemistry lab. This is the list of needed tools:
- etching machine (if you have exacly this machine, torx screwdrivers are handy)
- UV expusure unit, preferably with light bulbs from both sides
- magnetic stirrer (optional)
- thermometer (optional)
- precision scale
- bowl, slighly bigger than your PCB
- beaker big (2 l)
- beaker small
- scoop
- glass stirrer
- cotton pad
- stapler
- ruler
- scissors
- plate shear
- sink
- fume extractor
- safety goggles
- lab coat
- gloves
Procedure
Masks for UV exposure
-The PCB design and layout should be completed by students and comply with both ERC and DRC respectively. -Place ground planes on both top and bottom of PCB design (use polygon feature in eagle) to limit the amount of etching required. -Select top layer of PCB and show only tracks, ground planes, Via's and Pad's and selected marking's to be shown on PCB, note anything that is shown will be etched on to the PCB. -Save using Print to PDF ensuring the color is black, size is A4, removing attributes from the bottom of page and saving with a recognizable file name i,e PCB_top. -Select Bottom layer of PCB and show only tracks, ground planes, Via's and Pad's and selected marking's to be shown on PCB, note anything that is shown will be etched on to the PCB. -Save using Print to PDF ensuring the color is black, size is A4, removing attributes from the bottom of page, SELECT THE MIRROR FUNCTION and saving with a recognizable file name i,e PCB_Bottom. -At least one side of PCB mask must be mirrored due to the geometric nature of applying the mask. -Print both sides of PCB design on the top and bottom of an A4 paper. To do this print one side of PCB design on A4 sheet of paper, than place printed sheet of paper back in the printer's paper tray, ink side up with the already printed PCB design at the bottom of the paper tray. -Check to see if design is correctly aligned, To do this fold paper in half and check for correct pad and via locations. -If all is correct than repeat printing process with projector paper. -cut projector paper and align PCB schematic on top of each other ensuring the inked sides of the sheets are inside together, and secure in place with sticky tape ( Pro tip cut sheet off center, for easier sticky tape application).
Safety instructions
The following substances will be used:
- toner compressor
- developer / sodium hydroxide (Natriumhydroxid, NaOH)
- etchant / sodium persulafte (Natriumpersulfat, Na2S2O8)
- ethanol (C2H6O)
- distilled (purified) water (H2O)
Make yourself familiar with safety precautions for these substances and read the safety data sheets for them.
As stated in the beginning the following steps are normally performed in a proper lab after special security instructions and under supervision.
Set up developing and etching solutions
Put on your safety equipment. This includes glasses, lab coat and gloves. Make yourself familiar with the tools.
- Fill the beaker with 250 ml distilled water.
- Fill 5g sodium hydroxide into your beaker. In order to get the right amount use the precision scale and a weighing boat. Close the container of sodium hydroxide as sodium hydroxide is hrydrophilic.
- Stir the liquid in the beaker with a glass rod until everything is dissolved.
- Pour the solution into the plastic bowl.
- Fill the big beaker with approximately 1.6 liter of distilled water.
- Add 300g sodium persulfate to it.
- Use the magnetic stirrer (if available) to heat the big beaker up and help dissolving the sodium persulfate at the same time (setting 4 / 4). As etching etching works best above 40°C (and below 50°C). Try to heat the solution up until it reaches 40°C.
- If there is no magnetic stirrer available, stirr the solution and continus. The etching machine also has a heater, it will just take longer.
- When the solution is ready turn off the magnetic stirrer and pour the solution carefully into the etching device.
- Turn on the heating and air compressor of the etching device by plugging it into the electric outlets.


UV exposure
- Get the transparent foils containing your PCB design.
- Apply some density spray to both foils. Make sure to apply it on the side with the printing. This step has to be executed in a well ventilated room, if available do it under a fume cupboard.
- Wait for the density spray to dry. The black areas should be clearly darker now.
- Use scissors to cut out your design. Leave a big surrounding area, as you will nedd it for stapeling.
- Place the foils on top of each other. The sides with the printing on it have to be facing each other (the board will be in between of the foils later).
- Staple the foils together while trying to align them perfectly.
- Check the alignment. Misalignments will probably result in defective PCBs later.
- Get a piece of fotensensitive base material (FR4 in this case) for exposure. It should only be slightly bigger than your design. If necessary cut it with a plate shear.
- Remove the blue protection foil (see figure 4) on both sides.
- Avoid exposing the unprotected plate to sunlight (all UV sources). Best to have a special room for this step, if not available make sure to not waste to much time.
- Beware: For your own safety avoid looking into the uv lights. The device is to be only turned on when closed!
- Turn it on and wait for the vacuum to go up (to 0.3 with our device, compare to figure 7). The vacuum prevents things from moving and presses foils and PCB together.
- Set the exposure time to two minutes and thirty seconds (the display should read 2-3-0), make sure the bottom lights are also enabled if you are making a two sided PCB and start the device by pressing the knob once.
- When the time is up the lights will automatically be turned off and the vacuum will be released.
- Open the device and get out the exposed board.
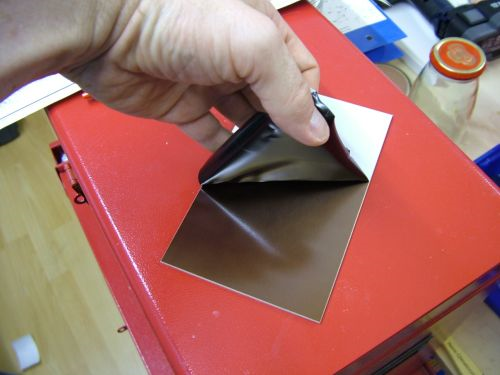 Fig. 4: Remove protection foil
 Fig. 5: UV exposure device
 Fig. 6: Board under plate
 Fig. 7: Check vacuum
Developing and etching the board
- Remove the exposed board from the foils.
- Put the board into the prepared bowl of the development solution. Stir it with a stick.
- Brown residues from the exposed parts of the board should start to appear after a couple of seconds. Stir until the process seems to stop and take it out immediately. Do not leave the board in for longer than 90 seconds maximum.
- Rinse the board thoroughly with (purified) water.
- Check the temperature of the etching solution, it should be above 40 and below 50 degrees C. If not, keep waiting.
- Mount the board to the grey retainer (see figure 8). To speed up the procution process you may want to mount two boards at the same time.
- Submerge the board(s) in the tank.
- Wait for the etching process to complete. You may have to wait a couple of minutes before something seems to be happening but from this point it should be going quite fast and obvious.
- Take out the board when etching is complete. Do not wait to long as it will affect the protected traces as well if you wait too long.
- Rinse the board(s) thoroughly with (purified) water.
- Repeat these steps until all team members have a PCB.
- Shut down pump and heating.
- Use ethanol and paper tissue to remove the remaining photoresist from the board(s). Be thorough.
- Let the board(s) dry. You can also use compressed air to speed things up.
- Clean the lab equipment, rinse everything with water.
- Dispose of waste properly.
